Bring Live Information to your ServiceNow Incidents
If you’ve ever looked at ServiceNow Security Incident Response, you’ll see this very cool feature in related links titled “Run Orchestration”. It contains a few workflows that will reach out to various systems related to a Security Incident (running processes on related system/whois lookup,etc) and populate that data in a space called “Enrichment data”. This makes it easy for the people involved in doing their investigation to get all of the information they need. While looking at this, I thought, “Wouldn’t it be nice if we could also get live related CI information into ITSM Incidents to make life easier for the help desk staff?”
The Strategy
I was inspired by this youtube demo from ServiceNerd. (An Excellent channel to learn from). With the power of REST and Flow Designer, we can easily fetch data from another source and bring it into any record, in this case an incident. It is a simple 2 pronged process.
- Retrieve the data from the REST endpoint it, for example:
- This could be a Flow Designer workflow that triggers whenever the CI or Service changes on the incident to the related service
- A simple UI action to manually trigger a Flow Designer action, as is practiced in Security Incident.
- Output the data so that the fulfiller can view it, for example:
- Populate data in Worknotes
- Popluate data in GlideModal
The Solution
For demo’s stake we’ll create a simple UI action on the Incident form, that populates when the SAP Enterprise Service is selected. When the UI action is clicked, it will run a REST query against our sample REST interface, that will return all access data relevant to the caller’s user id. (in a real world scenerio we would have a REST API that contained the SAP access data so that the helpdesk could verify the users access).
Create a Flow Designer REST Action
We will use this simple public api for demo purposes
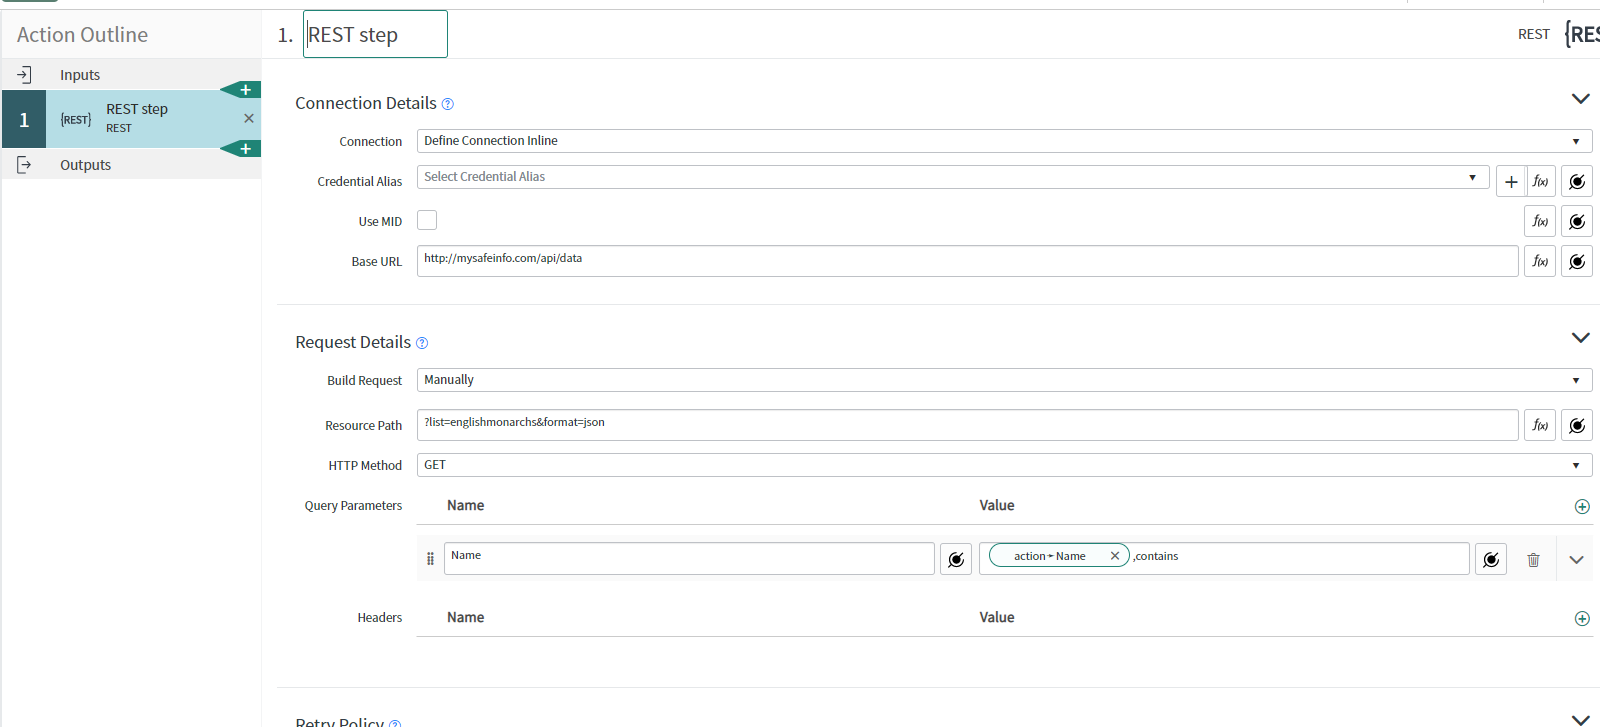
http://mysafeinfo.com/api/data?list=englishmonarchs&format=json&Name=Ed,contains
- Open Flow Designer and create a new action
- Set input with title “name”.
- Add a new REST step (zoom in to enlarge)
- Set output with title “result” and value of of response body from REST step.
- Save and publish
- Go to the “more actions” menu to retrived “code snippet” for client script. This will contain the javascript you need to call this action from a client side ui script.
Create a UI action to call the Flow Designer REST Action
Now we’ll go to the Incidents table and create a new UI action
- Open an Incident and right click the header –>Configure –> UI actions
- Click New
- Check off Form Link
- Title it “Check SAP Access”
- Set onclick to “getlistwindow()”.
- set condition to “current.business_service==’26da329f0a0a0bb400f69d8159bc753d’” - this is the sys_id for the SAP Enterprise Service in a PDI.
- Sample script below. This is derived from the script retrieved from the flow designer action.
function getlistwindow() { g_form.addInfoMessage("Fetching Data, <strong>one moment please....</strong>"); var inputs = {}; var caller = g_form.getReference('caller_id'); inputs['name'] = caller.user_name; // String //inputs['name'] = 'Edward'; // String g_form.addInfoMessage('Searching on ' + inputs['name']); GlideFlow.startAction('global.test_sap_sample_query_action', inputs).then(function(execution) { return execution.awaitCompletion(); }, errorResolver) .then(function(completion) { var status = completion.status; if (status == 'ERROR') { g_form.addInfoMessage('ERROR'); return false; } // Available Outputs: var outputs = completion.outputs; var result = outputs['result']; // Object var result2 = JSON.parse(result); if (result2 == '') { g_form.addInfoMessage('Nothing Found'); return false; } var gdw = new GlideModal('Display list'); // displays list of feed gdw.setSize(750, 300); gdw.setTitle('Display List'); //Set up valid custom HTML to be displayed var data = result2; var keys = Object.keys(data); var list = '<table><tr><th>ID</th><th>Name</th><th>Country</th><th>House</th></tr>'; keys.forEach(function(key) { var values = data[key]; list +='<tr><td>' + values.ID + '</td> <td>' + values.Name + '</td> <td>' + values.Country + '</td> <td>' + values.House + '</td> <td>'; }); list += '</table>'; list += 'Please see <a target="_blank" href="https://google.com/search?q=Try+Google">KB123</a> for details'; gdw.renderWithContent(list); g_form.clearMessages(); //add to work notes var wn = '[code]'; wn += '<H2>Data Retrieved from UI action</H2>'; wn += list; wn += '[/code]'; g_form.setValue('work_notes', wn); //g_form.save(); }); function errorResolver(error) { // Handle errors in error resolver } } - Click save. Now open an Incident and set the Service to “SAP Enterprise Service” and save. The UI action will appear under related links. Click on it to check if the data in the json aligns with the caller id.
Result


Leave a comment