
Rundeck OpenSource and SSO
Summary
I’ve always been a big fan of Rundeck due to its flexibilty to do almost anything. I find it is a good compliment to ServiceNow when you need to run “Pro Code”, since you can configure Rundeck Jobs to execute Python/PowerShell/Ansible and then trigger those executions from a REST API!
However, you want Single Singon, it is not available in the open source offering, only in the Pager Duty licensed offering. The good news is we can leverage Rundeck’s preauthentication feature and place an Apache Reverse proxy in front of Rundeck to handle the authentication and user creation!
There are a few tutorials out there using Keycloak. In my sample case I have used Authentik.
- https://medium.com/@serg-digitalis/rundeck-with-keycloak-authentication-8f84b1e1dce1
- https://devopstales.github.io/sso/rundeck-sso/
Solution
This assumes the following:
- We have an Ubuntu/Debian Linux host “rd.domain.home” to run Apache and Rundeck on
- We have a Linux host “authentik.domain.home” already running K3s/Authentik. Install docs
- We have an Authentik OIDC/OAuth2 application configured (defaults are fine)
If you don’t have a DNS server, you can always override in your workstations host file.
Install and Configure Rundeck
- On the new rd.domain.home host load Rundeck (we could use docker but the Rundeck docker image obfuscates things and isn’t great for tutorial purposes)
sudo apt-get install openjdk-11-jre-headless -y curl https://raw.githubusercontent.com/rundeck/packaging/main/scripts/deb-setup.sh 2> /dev/null | sudo bash -s rundeck sudo apt-get update -y sudo apt-get install rundeck -y sudo systemctl daemon-reload sudo service rundeckd start - Edit the
/etc/rundeck/rundeck-config.propertiesfile. Set your hostname as needed.
# UPDATE THESE LINES
# grails.serverURL=http://localhost:4440
grails.serverURL=https://rd.domain.home
# this will allow you to access this instance from any valid hostname however CAN CAUSE PROXY ISSUES.
# rundeck.multiURL.enabled=true

# add these lines to the end of the config file
rundeck.security.authorization.preauthenticated.enabled=true
rundeck.security.authorization.preauthenticated.attributeName=REMOTE_USER_GROUPS
rundeck.security.authorization.preauthenticated.delimiter=,
rundeck.security.authorization.preauthenticated.userNameHeader=X-Forwarded-Username
rundeck.security.authorization.preauthenticated.userRolesHeader=X-Forwarded-Roles

# sync user info headers
rundeck.security.authorization.preauthenticated.userSyncEnabled=true
# these are the default headers for passing user details
rundeck.security.authorization.preauthenticated.userFirstNameHeader=X-Forwarded-User-FirstName
rundeck.security.authorization.preauthenticated.userLastNameHeader=X-Forwarded-User-LastName
rundeck.security.authorization.preauthenticated.userEmailHeader=X-Forwarded-User-Email

# Redirect to upstream logout url
rundeck.security.authorization.preauthenticated.redirectLogout=true
rundeck.security.authorization.preauthenticated.redirectUrl=/logout
Now restart Rundeck sudo systemctl restart rundeckd
It may take a minute to load. At this point rundeck should be accessible at http://rd.domain.home:4440. If you want to login with the default admin account, you will need to set rundeck.multiURL.enabled=true and restart the rundeck service but this is not neccessary.
Install Docker/Apache
On the new rd.domain.home host install docker
# Add Docker's official GPG key:
sudo apt-get update
sudo apt-get install ca-certificates curl gnupg
sudo install -m 0755 -d /etc/apt/keyrings
curl -fsSL https://download.docker.com/linux/ubuntu/gpg | sudo gpg --dearmor -o /etc/apt/keyrings/docker.gpg
sudo chmod a+r /etc/apt/keyrings/docker.gpg

# Add the repository to Apt sources:
echo \
  "deb [arch=$(dpkg --print-architecture) signed-by=/etc/apt/keyrings/docker.gpg] https://download.docker.com/linux/ubuntu \
  $(. /etc/os-release && echo "$VERSION_CODENAME") stable" | \
  sudo tee /etc/apt/sources.list.d/docker.list > /dev/null
sudo apt-get update

 sudo apt-get install docker-ce docker-ce-cli containerd.io docker-buildx-plugin docker-compose-plugin -y

#add perms to current user
 sudo usermod -aG docker $USER
 newgrp docker
On the new rd.domain.home host install Apache Container
First create a Docker file that will include our extra components and support ssl/mod_auth_openidc. This script will generate and build the docker image.
###create image for oidc
cat <<'EOF' > Dockerfile
FROM ubuntu/apache2:latest

ENV DEBIAN_FRONTEND=noninteractive

# Install JRE, mod_auth_openidc, and SSL tools
RUN apt-get update && \
    apt-get install -y \
        default-jre \
        libapache2-mod-auth-openidc \
        openssl \
        curl \
        gnupg \
        vim && \
    apt-get clean && \
    rm -rf /var/lib/apt/lists/*

# Enable required Apache modules and SSL site
RUN a2enmod auth_openidc ssl headers proxy_http rewrite && \
    a2ensite default-ssl && \
    openssl req -subj '/CN=example.com/O=My Company Name LTD./C=US' \
        -new -newkey rsa:2048 -days 365 -nodes -x509 \
        -keyout /etc/ssl/private/ssl-cert-snakeoil.key \
        -out /etc/ssl/certs/ssl-cert-snakeoil.pem

EXPOSE 80 443

CMD ["apache2ctl", "-D", "FOREGROUND"]
EOF

# Build the Docker image
docker build -t apache-oidc .
Create the Apache container
Next create the Apache container with an Apache Vhost file mounted outside of the container
#get default ssl config from container
docker run --name temp-apache -d apache-oidc && docker cp temp-apache:/etc/apache2/sites-available/default-ssl.conf ./default-ssl.conf && docker rm -f temp-apache

#create container with mounted file
docker run -d --name apache2-container -v "$(pwd)/default-ssl.conf:/etc/apache2/sites-available/default-ssl.conf" -e TZ=UTC -p 443:443 -p 80:80 apache-oidc
At this point the Apache server should be available at https://rd.domain.home
Update the vhost file
Now, update the vhost file using this sample file and restart the apache container. At a minimum you will need to:
- Update the clientid
- Update the client secret
- Set your hostname
- Set your OIDC application name in the meatadata url
# Define server hostname for rundeck
Define RDHost rd.domain.home

<VirtualHost *:80>
    ServerName ${RDHost}
    DocumentRoot /var/www/html
    Redirect permanent / https://${RDHost}/
</VirtualHost>

<VirtualHost *:443>
    ServerName ${RDHost}
    DocumentRoot /var/www/html

    SSLEngine on
    SSLCertificateFile /etc/ssl/certs/ssl-cert-snakeoil.pem
    SSLCertificateKeyFile /etc/ssl/private/ssl-cert-snakeoil.key

    #debug oidc - do not leave this on unless troubleshooting
    #LogLevel auth_openidc:debug

    # OpenID Connect Configuration
    OIDCRedirectURI https://${RDHost}/oidc/callback
    OIDCCryptoPassphrase passphrase
    OIDCSSLValidateServer Off
    OIDCProviderMetadataURL https://authentik.domain.home/application/o/rundeck/.well-known/openid-configuration
    OIDCClientID <your clientid>
    OIDCClientSecret <secret123>
    OIDCScope "openid email profile"
    OIDCRemoteUserClaim preferred_username

    ProxyPreserveHost On
    ProxyRequests Off

    <Location />
        AuthType openid-connect
        Require valid-user

        RequestHeader set "X-Forwarded-Username" %{REMOTE_USER}s
        RequestHeader set "X-Forwarded-Roles" %{OIDC_CLAIM_groups}e
        RequestHeader set "X-Forwarded-User-Email" %{OIDC_CLAIM_email}e

        ProxyPass http://${RDHost}:4440/
        ProxyPassReverse http://${RDHost}:4440

        RequestHeader set "X-Forwarded-Proto" https
        RequestHeader set "X-Forwarded-Port" 443
    </Location>

    <Location /logout>
        AuthType openid-connect
        Require valid-user

        OIDCUnAuthAction auth

        # Clear the local session
        UnsetEnv OIDC_CLAIM_sub
        UnsetEnv OIDC_CLAIM_session_state
        UnsetEnv OIDC_CLAIM_id_token
        UnsetEnv OIDC_CLAIM_groups
        UnsetEnv OIDC_access_token

        # Remove OIDC session cookies
        Header always set Set-Cookie "mod_auth_openidc_session=; Max-Age=0; Path=/; HttpOnly; Secure"

        # Redirect to Identity Provider's logout endpoint
        RewriteEngine On
        RedirectMatch /logout "https://authentik.domain.home/application/o/rundeck/end-session/"
    </Location>

</VirtualHost>
Restart Docker
docker restart apache2-container
You should now be able to login 1 of 2 ways
- Via SSO https://rd.domain.home
- Locally http://rd.domain.home:4440 if you alter the rundeck-config.properties and set rundeck.multiURL.enabled=true, however this can prevent the reverse proxy from loading properly. Only use for troubleshooting.
Finally you’ll need to add ACL’s so that the SSO users have access. For example so that all authentik admins have rundeck admin access copy the default admin acl policy and set the group to “authentik Admins”. Login as local admin to complete this.
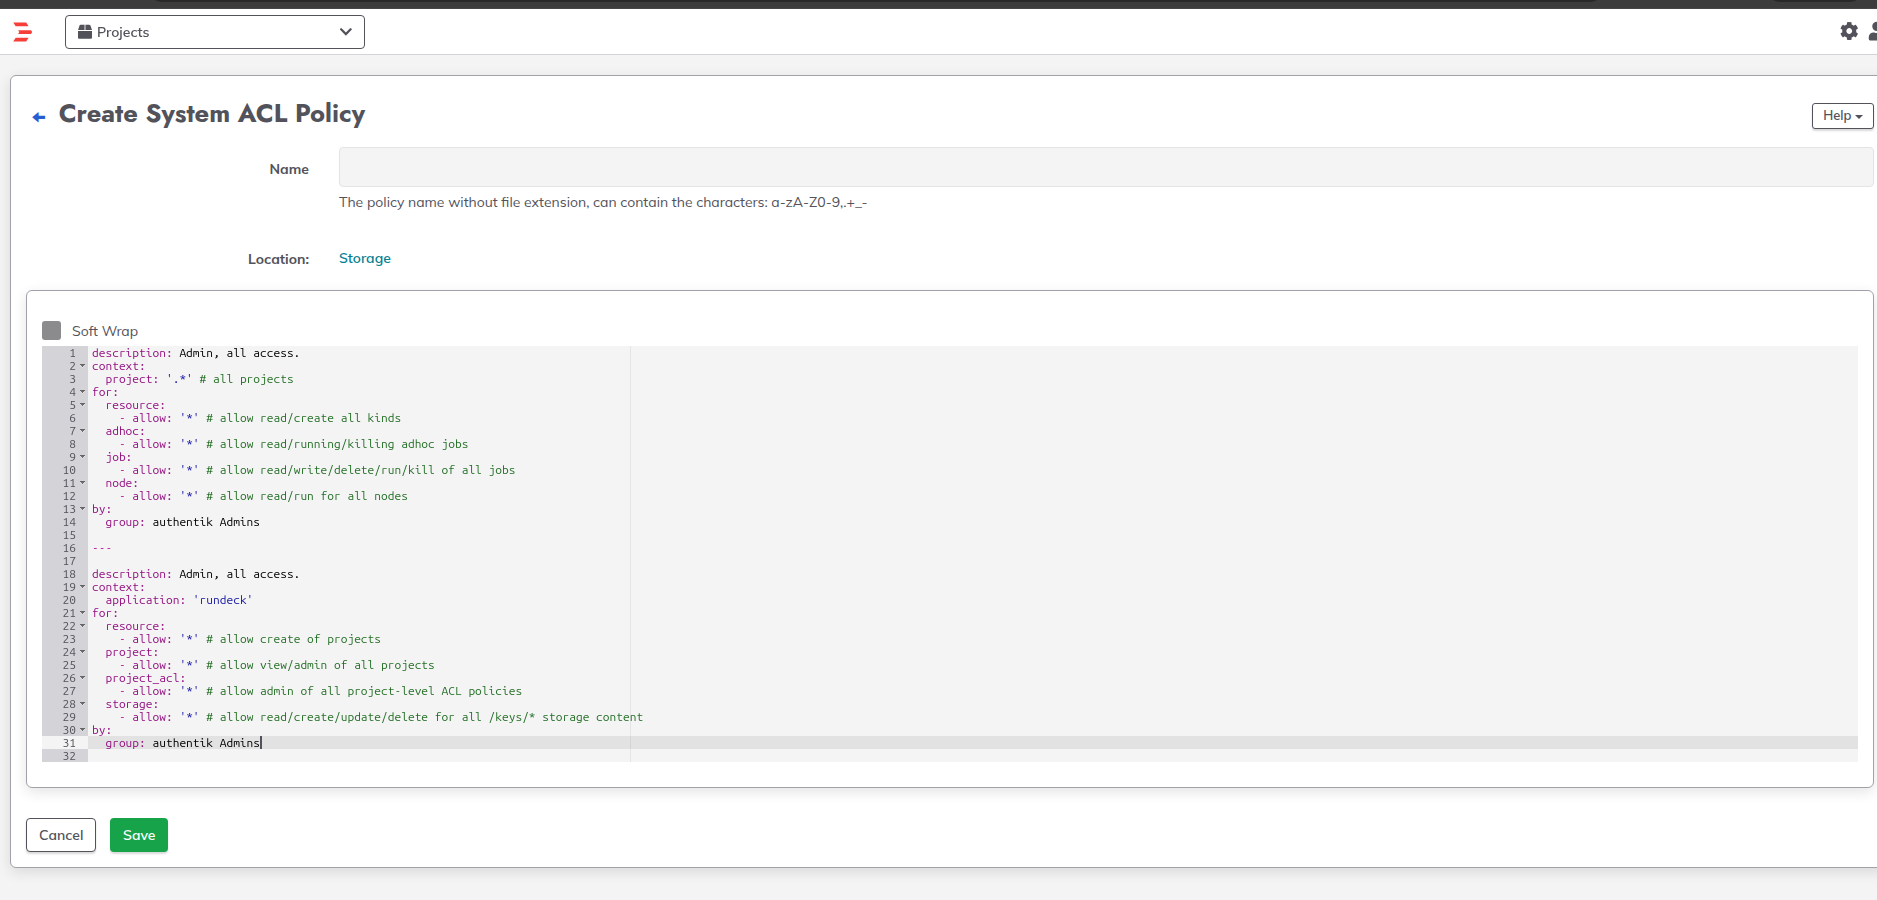
- Open the gear icon in the top right
- Click Access Control
- Copy the default admin policy (click edit to see it)
- set group in the policy as “authentik Admins” and save
At this point you should now be able to login with the admin role as any Authentik admin user.
Leave a comment